

Welcome to QuickConnect
This page provides a starting point for installing, launching, and learning how to use QuickConnect. The software is intended for Windows users who need a focused remote connection utility with clear setup and support information.
Before you install
Download QuickConnect only from Nevonix LLC or an authorized software store, and confirm that the installer shows Nevonix LLC as the verified publisher.
After installation
Launch QuickConnect from the Start menu or the installed application folder, then follow the setup instructions provided in the application.
Remote desktop software without a monthly subscription
QuickConnect is designed for Windows users who need secure remote desktop software, remote PC access, and remote control without recurring subscription fees. A one-time QuickConnect purchase licenses the selected number of PCs, while optional major feature upgrades may be offered separately.
One-time remote desktop license
Buy the PC licenses you need once instead of paying a monthly remote access subscription. The base package includes two PC licenses, and additional PC licenses can be added to the same purchase.
Secure remote access and file transfer
Connect to authorized Windows PCs, control the remote desktop, navigate monitors, exchange clipboard text, and transfer files or folders through direct or server-assisted connections.
How to use QuickConnect
The Configuration Tool prepares the local PC, activates its license, and stores connection entries for the other QuickConnect PCs you use. After setup, the main QuickConnect window lets you select a configured server and registered PC.
Enter your profile and review the license status
Enter the name and email address associated with this installation. The first screen also shows whether QuickConnect is already activated on the current PC and provides access to license management.
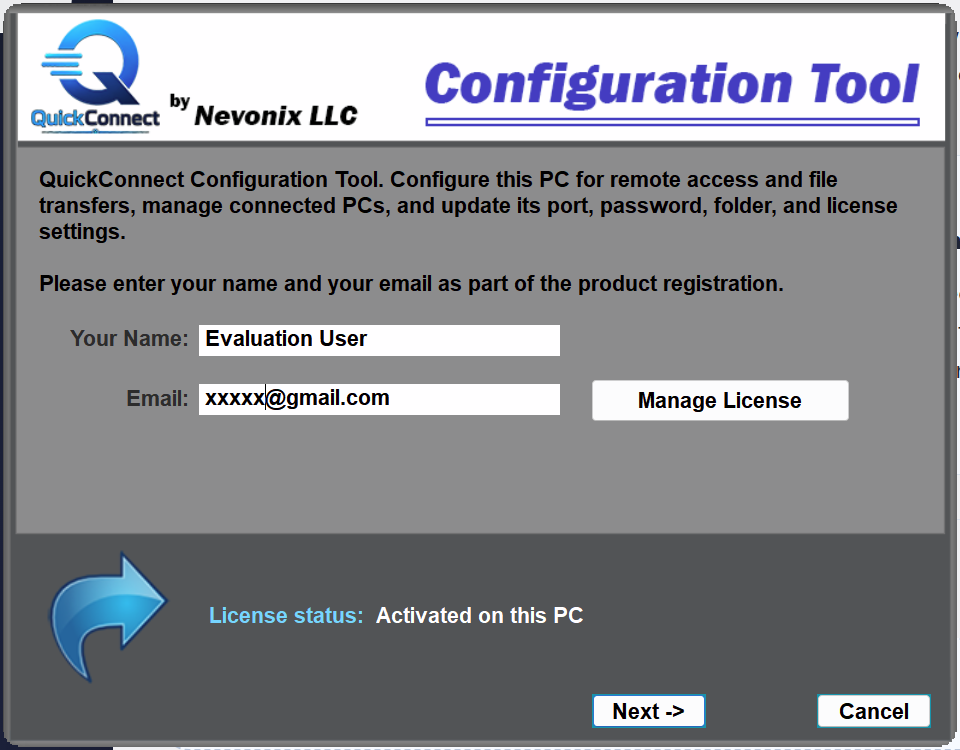
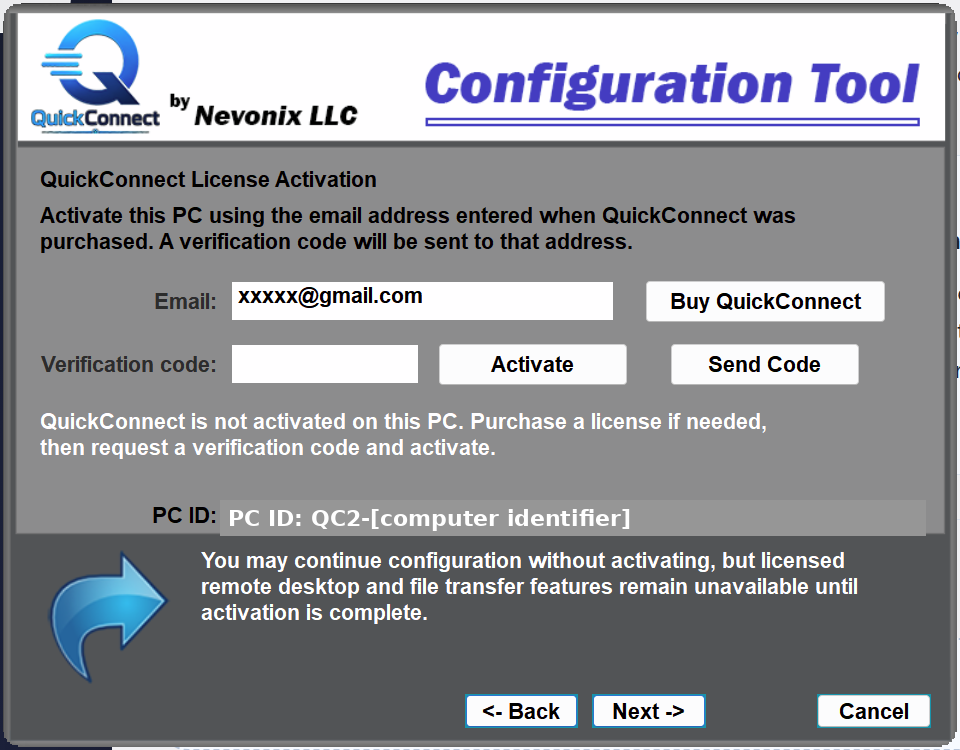
Activate this PC when a license is required
Enter the purchase email, request the six digit verification code, and enter that code before selecting Activate. Configuration can continue without activation, but licensed remote desktop and file transfer features remain unavailable until activation is complete.
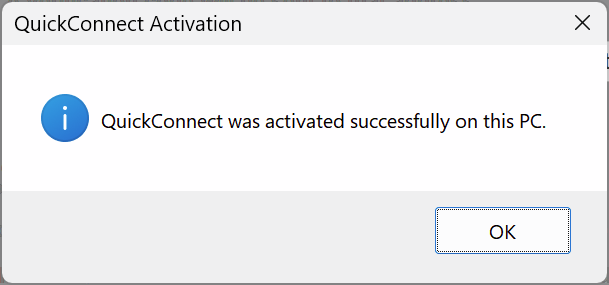
Confirm successful activation
After the server accepts the verification code, QuickConnect confirms that the current PC was activated successfully. Close the confirmation and continue through the remaining configuration screens.
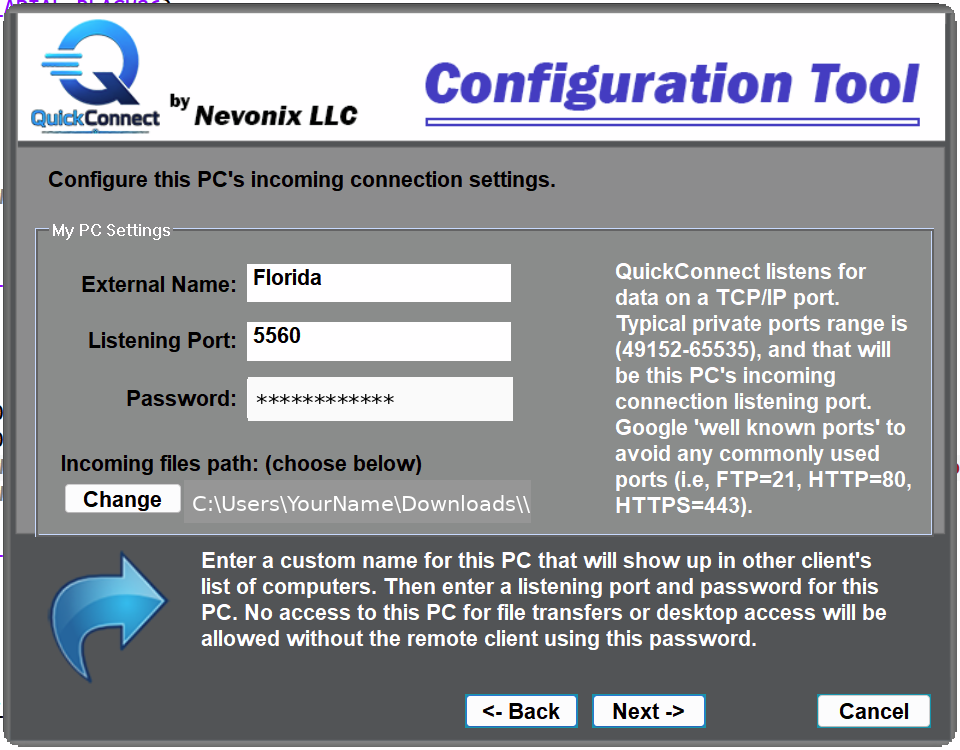
Configure this PC for incoming connections
Choose the display name that other PCs will see, set the listening port and access password, and select the folder where incoming files should be saved. Use a port that is not already assigned to another service.
Add the other QuickConnect PCs you need to reach
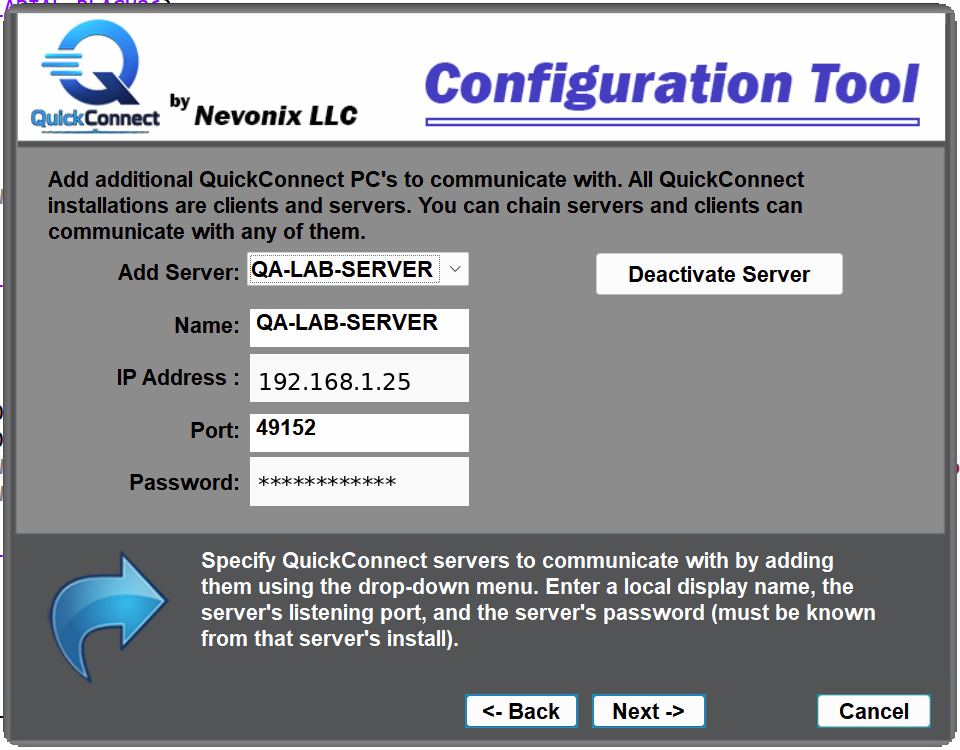
QuickConnect provides up to nine additional server entries. For each server you want to use, enter a meaningful display name, the remote PC's domain name or IP address, its listening port, and the password configured on that remote PC.
Any server entry named inactive is ignored and will not be used for connections. Selecting Deactivate Server renames that entry to inactive and clears its address, port, and password fields. Leave only the server entries you intend to use with an active name other than inactive.
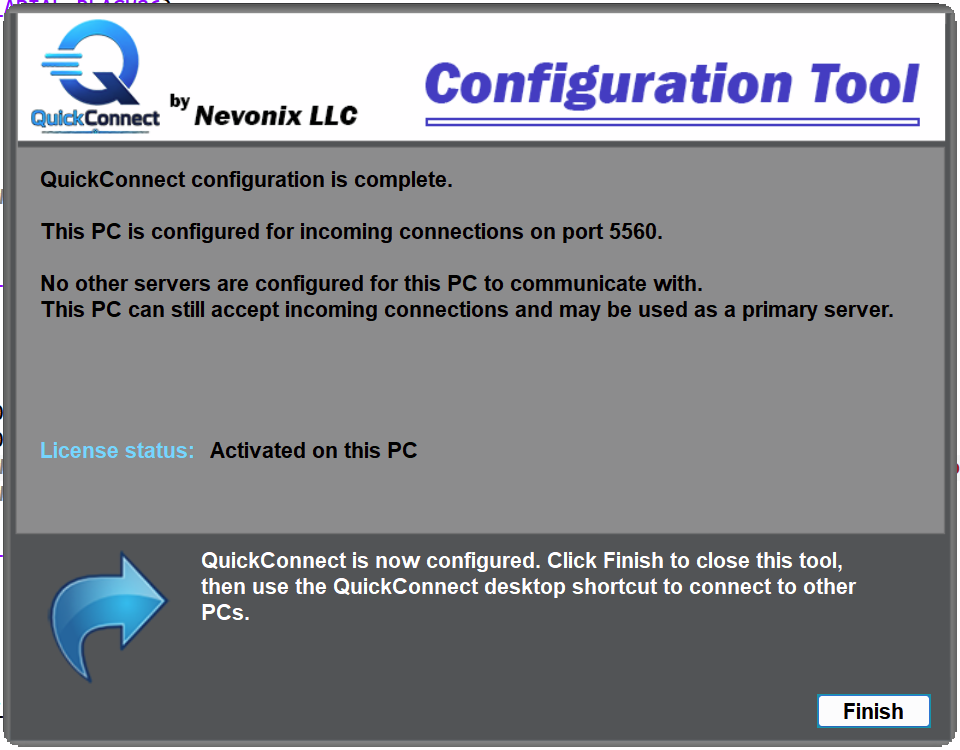
Review the configuration summary and finish
The final Configuration Tool screen summarizes the incoming port, configured server entries, and license status. Select Finish to save the setup and close the tool.
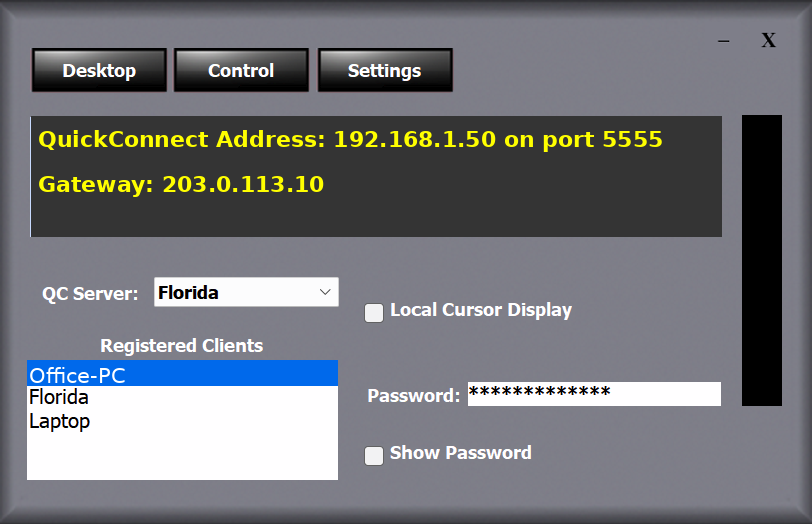
Viewing Online PCs
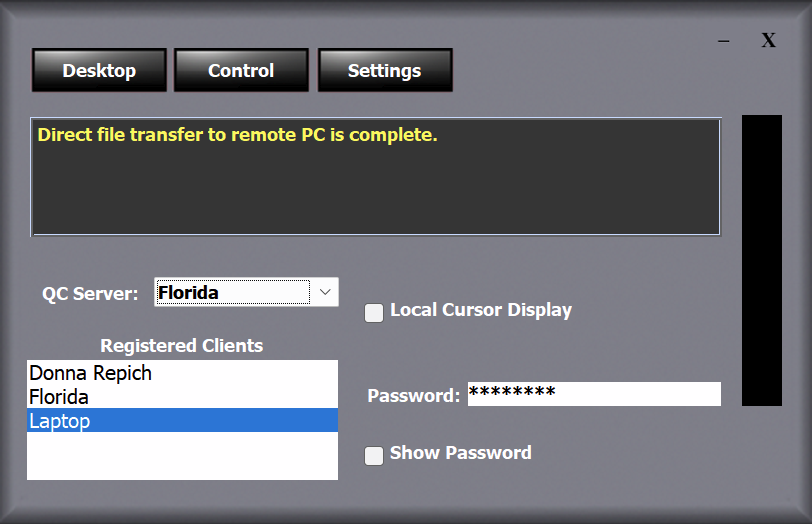
The QC Server field is a selection box that determines which QuickConnect server supplies the list of online PCs. The first server in the list is your own PC, which also operates as a QuickConnect server.
In the Registered Clients box, select the remote PC you want to use. Then select one of the three buttons at the top of the window: Desktop opens a remote desktop connection, Control sends remote control commands, and Settings opens the configuration settings.
Any QC Server entry after the first represents an additional QuickConnect server you added rather than your own PC. When you select one of these servers, the Registered Clients box shows the PCs currently registered with that server. Whichever server you select, and whichever client you select from the Registered Clients list, QuickConnect connects to that remote PC either directly or indirectly through the selected server.
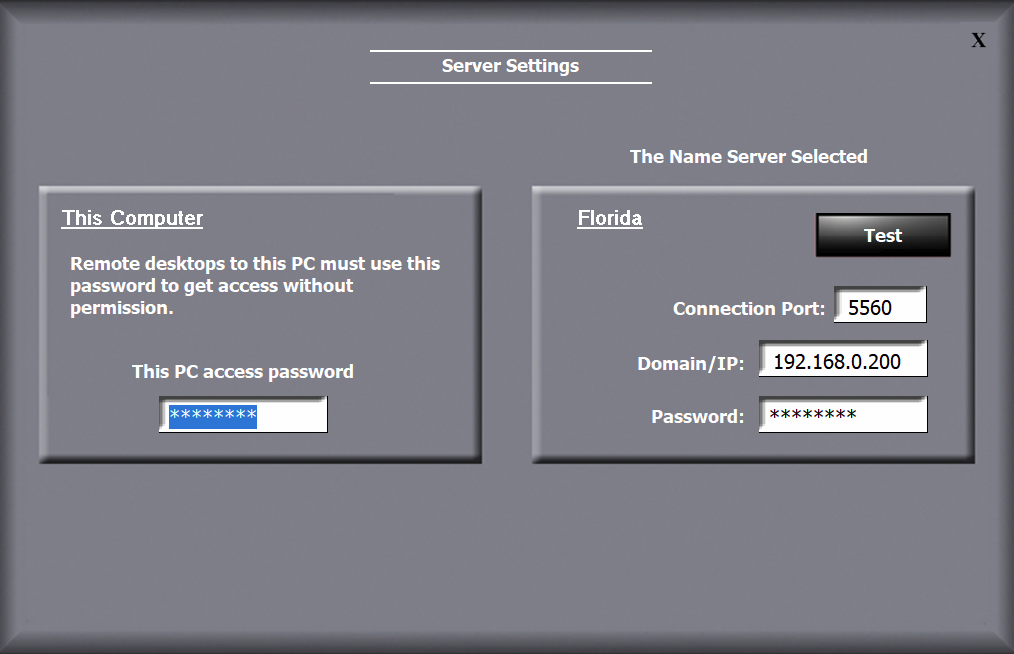
Review or test server settings
The Server Settings screen controls access to whichever server is selected in the QC Server list on the previous screen. If you did not add any additional servers during configuration, the selected server is this PC. In that case, the connection port is this PC's incoming QuickConnect port, and the Domain/IP field should contain this machine's actual IPv4 address or 127.0.0.1. Use Test to confirm that the IP address, port, and password are correct.
If you added other servers during configuration, select one from the QC Server list. The registered clients associated with that server will appear on the main screen, and the Server Settings screen will then display and control the connection information for that selected server.
Transfer a file to the selected client
Drag a file onto the QuickConnect main window to send it to the registered client currently selected in the client list. You can also drag a file directly into an open remote desktop window.
If the saved password for the selected client is correct, the transfer begins automatically. If the password is blank or incorrect, the remote PC prompts its user to authorize the transfer.
Send files or folders to a remote PC
Drag a file or folder onto the QuickConnect main window to send it to the registered client currently selected in the client list. You can also drag the item directly into an open remote desktop window.
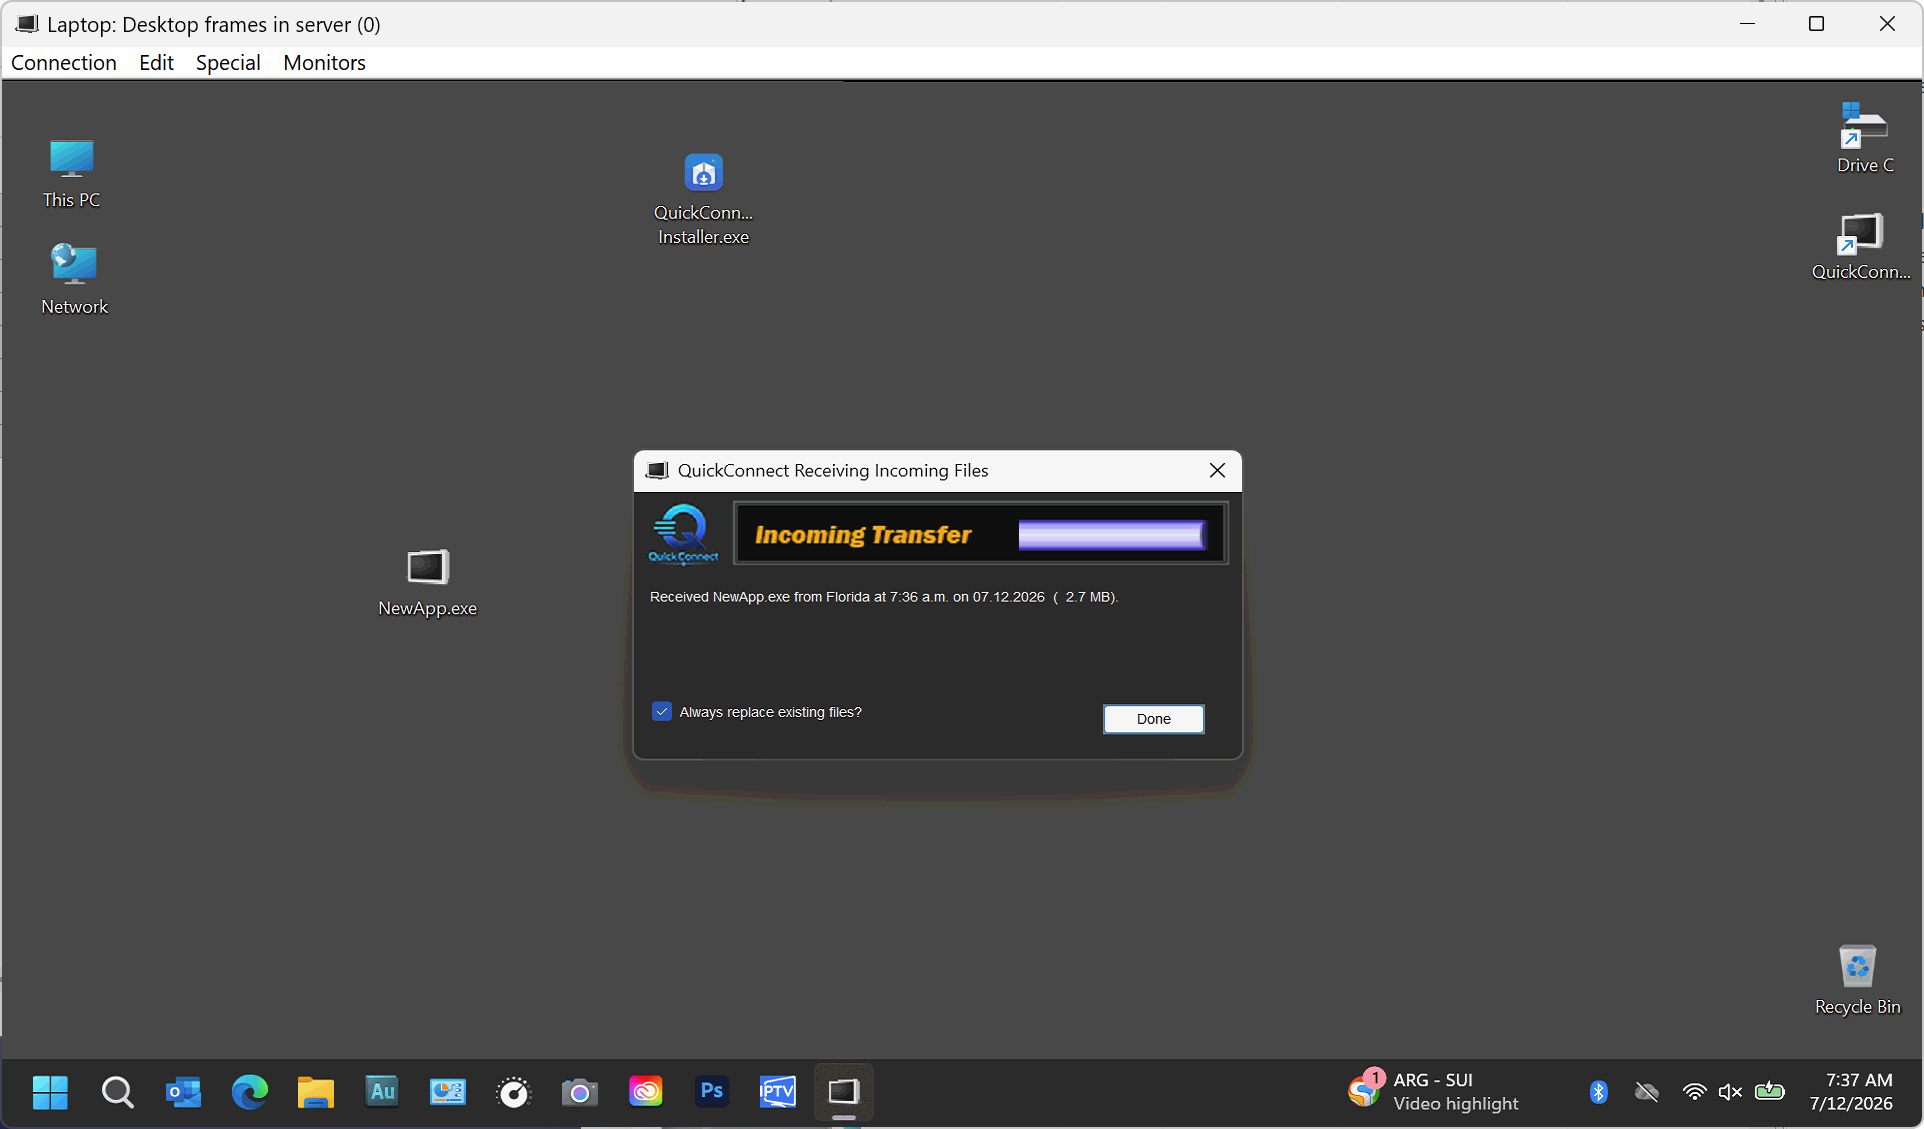
The receiving PC displays the Incoming Transfer dialog and saves the item in the incoming files path selected when the Configuration Tool was first run. When Always replace existing files? is checked, an item with the same name is replaced automatically. When it is not checked, QuickConnect asks for confirmation before replacing an existing item.
Retrieve files or folders from a remote PC
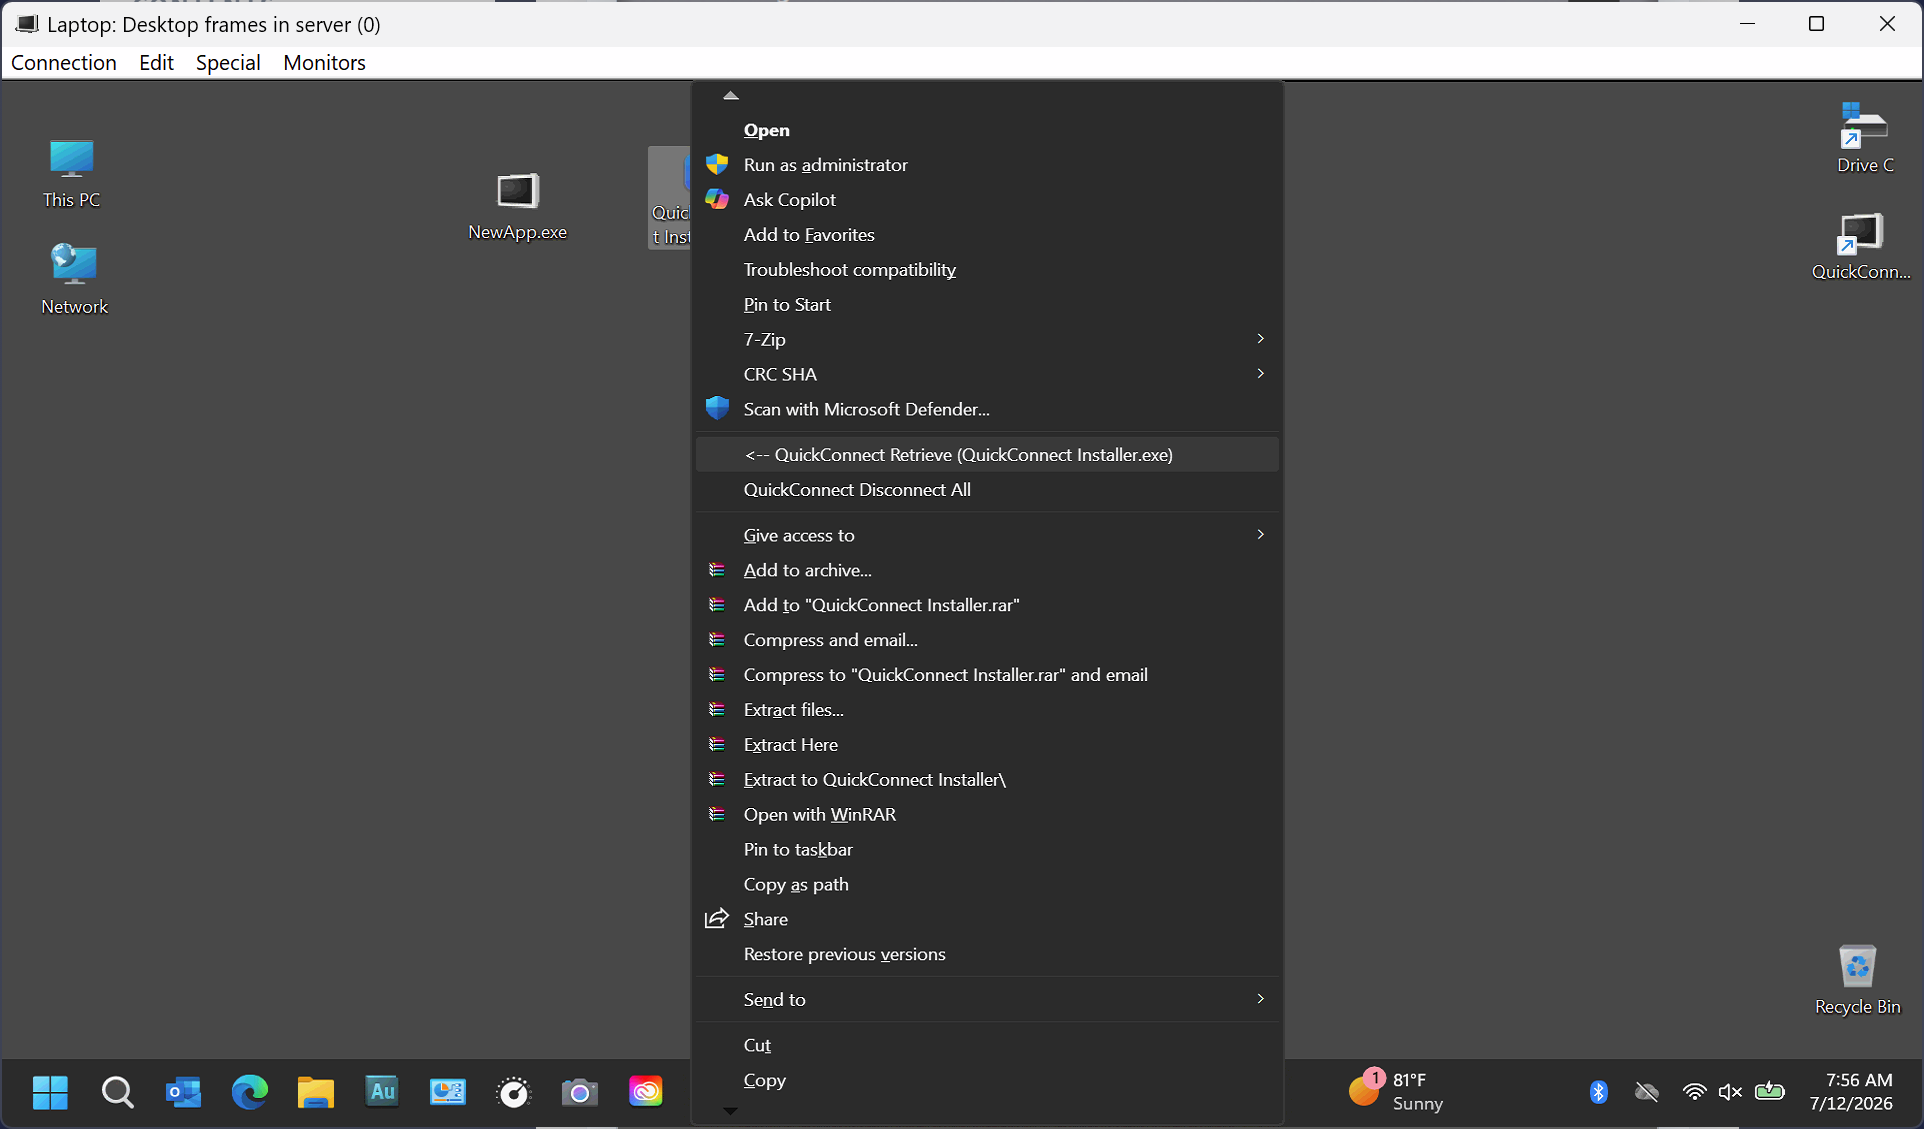
While viewing the remote desktop, right-click the file or folder you want to retrieve. In the Windows context menu, select <-- QuickConnect Retrieve. The menu item includes the name of the selected file or folder.
QuickConnect sends the selected item from the remote PC back to the local PC running the desktop session.
Remote Desktop Connecting
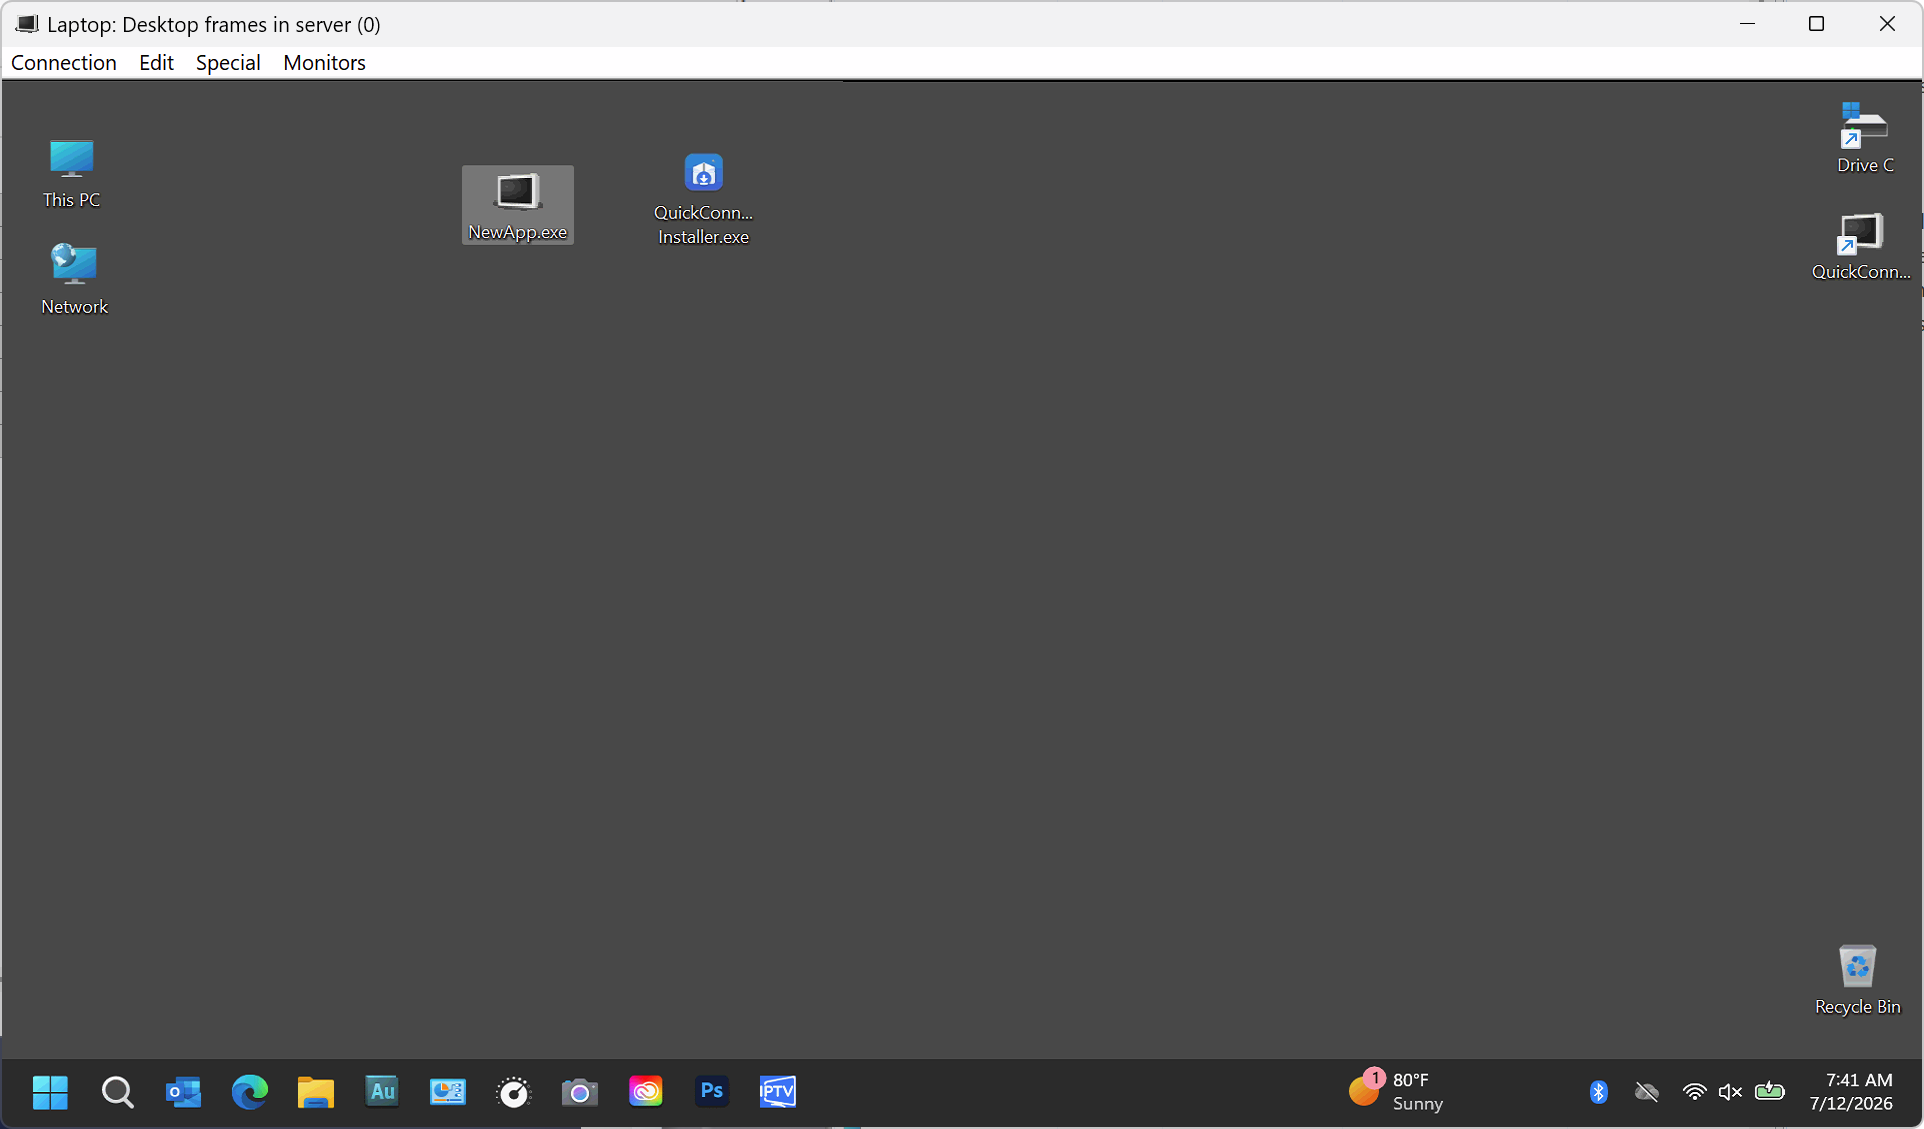
Select a server and registered client, then open the remote desktop. If the remote client password is blank or incorrect, the user on the remote PC is prompted to authorize the desktop connection.
- Monitors: move through the remote PC's monitors one at a time. QuickConnect does not combine all monitors into one view.
- Zoom: press CTRL+PAGE UP to zoom in and CTRL+PAGE DOWN to zoom out. Zoom controls are handled by these keyboard shortcuts rather than the remote desktop window menu.
- Special: send Escape, the Windows key, or Control Alt Delete to the remote PC.
- Edit: Paste sends text from the local clipboard to the remote PC. Copy copies selected text from the remote PC.
- Zoomed desktop navigation: when the remote desktop is enlarged above 100 percent, press CTRL+UP ARROW to move the view up, CTRL+DOWN ARROW to move it down, CTRL+LEFT ARROW to move it left, and CTRL+RIGHT ARROW to move it right.
- Reset zoom and position: press CTRL+W to return the remote desktop to 100 percent and reset the view to its default position.
Advanced technical information
Direct and server-assisted connections
When you connect to a registered client, QuickConnect first tests whether it can reach that client directly. A direct connection is normally possible when both PCs are on the same local network or subnet and the remote PC's built-in QuickConnect server is reachable.
If the direct connection cannot be established, QuickConnect automatically routes the connection through the selected QC Server. This allows the selected server to act as an intermediary between the client PC and the remote PC. For example, two PCs on the same subnet can usually connect directly through each PC's built-in QuickConnect server, while PCs on different networks may connect indirectly through the selected QC Server.
Reinstalling QuickConnect Remotely
QuickConnect can be reinstalled while you are connected to another PC through an active QuickConnect remote desktop session. Download the latest QuickConnect installer, transfer it to the remote PC, and run the installation normally on that machine.
The installer retains the existing QuickConnect configuration from the previous installation. After the installation completes successfully, the updated QuickConnect software starts on the remote PC and reconnects to the client PC that initiated the remote session.
QuickConnect remote desktop FAQ
Is QuickConnect remote desktop software available without a subscription?
Yes. QuickConnect uses a one-time PC license and does not require a monthly subscription. Major feature upgrades may be offered separately.
Can QuickConnect transfer files and folders between Windows PCs?
Yes. QuickConnect supports sending and retrieving files and folders during authorized remote connections.
Does QuickConnect support remote control of another Windows PC?
Yes. Authorized users can view and control a remote Windows desktop, send keyboard and mouse input, use clipboard text, and navigate remote monitors.
Can QuickConnect connect to PCs on different networks?
Yes. QuickConnect first attempts a direct connection and can use a selected QuickConnect server for server-assisted connections when the PCs are on different networks.
License terms
QuickConnect is licensed software provided by Nevonix LLC. Review the license terms before installing or using the software.
Contact
For support or questions about QuickConnect, contact Nevonix LLC at support@nevonix.ai.